Showing posts with label RedGate. Show all posts

Wednesday, June 10, 2009

New Sidebar Feature Links

Well it seems like a really good idea.

I've set up 2 hotlinks on my side bar to link to a menu posting that I use as a libraryed jumpsite to a whole lot of other postings.

One is my studio glazes. This will continue to be filled out as this moves along. It at least proves helpful when I can't find my recipe book.


The other is the Demo Library. This is worth checking out if you haven't had the time to dig through the past postings to see what's buried back there. I'll keep adding to it as we move forward so stay tuned....

Oh yeah... and any feed back REALLY helps!


Sunday, May 24, 2009

Creating a Paper Stencil Part 2

Here is the second part of this weeks demo...

The first part is in the previous post. It shows the technique I use for cutting out 30 to 40 stencils at a time. I do this by cutting my design out of a billet of newsprint sandwiched between sheet plastic using a jewelers saw and bench pin. I can actually get 60 to 80 stencils out a a single billet if I plan my design around the cut, using both the positives and negitves in a design.

This clip shows how I apply the stencils to create a composition. It goes on to show the slip being applied and the paper being peeled away revealing the surface design.

Enjoy!

Saturday, May 23, 2009

Creating a Paper Stencil Part 1

Alright... I know I've shown the process before, but shooting the pictures for these stop motion "how to" videos are how my kids are earning their allowance at the moment and I'm still learning how to put it all together.

This demo is divided into 2 parts. I know I have a hard time sitting still longer than 4 minutes, so I've tried to keep each clip relatively short.

I've got lots of question marks with these videos, but my big question right now is... Does it need sound? I have my stereo blasting Miles Davis and Trombone Shorty while I'm sitting around slapping these videos together, so I assume that everyone else sitting at their computer has their own trax playing in the background.

Self doubt and second guessing always seems to lurk in the shadows, luckily it rarely keeps me from having fun!

Monday, May 4, 2009

A Quick Look in the Box

I'm still sorting through and cleaning up works from the latest soda firing while I get caught-up with all of the gardening. There's a good amount of sell-able works, a few racers that I'll pull aside for summer exhibitions, and there is a fairly sizable number of losses. It's a fair trade for a first attempt at soda.


I can only hope the kiln gods are appeased for the next few loads. Matt and I are already anxious planning the next.


Sunday, May 3, 2009

The story is that this kiln is an old “Wind Kiln” that was contributed to Clay Planet in Sana Rosa, CA. by Steve Davis. It's now a co-op kiln shared among a small handful of ceramic artists in the Bay Area. It’s an approximately 15 cubic foot doghouse coffin kiln powered by 2 squirrel cage blowers. It’s proving to be a very nice and simple design that fires really well in 5 hours or less. Check out Steve’s site for a look at his newer version of this kiln, it's very cool and big. The word is that the sweet spots lurk under the shelving. This is where the soda seems to accumulate really well. I got to fire this critter with Matt Brown of MossBeach Ceramics last weekend with great results. There seemed to be sweet spots all over this kiln! The only cold spot seemed to be the far back, but this most likely had to do with having to switching out the old blowers with new underperforming blowers. No problem... it's just a matter of an adjustment in strategies.

It's fun being back to the exciting life of living on a new learning curve. This one is rather steep, but Matt and I are already planning the next firing. It's couldn't be soon enough.

Ahhhh... Soda


Ok.

I'm hooked. I'm a soda addict.


Sunday, March 1, 2009

March Cairn

I've been patiently letting this winters cairns dry over the past 2 months. Three of Decembers cairns were dry enough to begin working their way though the kiln earlier this week. Even with long slow bisque, I was waiting to hear the "PoP!" in the middle of the night. The bisque was Wednesday, and I fired off the second leg of the project last night. This was the first glazing for the 3 works. One was designed as a multi-fired piece, needing at least one more trip through. Another has options... involving decals and a re-fire. The 3rd is what's shown here and might stop at this point, or I might try a low-fired blob of lipstick red crowning it's top. That's the problem with sculptural works... lots of fidget room.

Friday, February 27, 2009

2-27 Kiln Load

Before I share what came out of this kiln load I really need to say something... Most people don’t realize how much risk is involved with creating studio ceramics. It’s really all old school alchemy. I stead of lead to gold, it’s clay to sellable work. (It really doesn’t sound as cool, I know, but still, it still takes a huge amount of study, confedence, and work.) I really felt that this was my riskiest kiln load of work to go through the studio in a good while. I loved all of the forms, and the slip stenciled designs were fantastic. It would have been so easy to push everything though with my “I pretty much know what I’m going to get” glazes that I’ve been working with over the past 9 months. But… I have a new glaze that I’ve been playing with. It's a generally untested glaze, but it’s proven to be an amazing glaze that breaks and crawls at cone 6. This load of work was designed to test this glaze’s interactions with most of my studio glazes. this is the point where I point out all of the beads of sweat, lots by the way, over this load of work. It's over 50 peices that will live or die when I open the kiln.

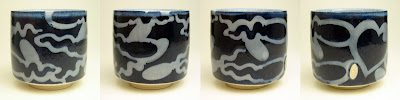
In a situation like this I quite honestly I would have been happy with a 50% loss ratio with this experiment. Hell, I’d have been happy with a 90% loss ratio. I had already seen what this glaze could produce and it would be worth loss just to get a handful of racers with it. I just didn’t know whether the racers I had made before were accidents of application and atmosphere, or whether my assumptions with this gaze were correct. Luckily I hit my marks with 6 out of 10 assumptions. There will be a few refires, but the bulk of this load is going up for sale. First come first serve, these really are amazing yunomi. A local venue has already laid claim to work that’s unsold by the 15th of March.


The first works I want to quickly note are the results of the Agate ware. These have been fired with a clear glaze. WoW! They really look great. The form’s true profile is pleasantly hidden by the marbling effect.
Love it! More in the next few day's...


Tuesday, February 24, 2009

EMT Stamp Exchange part 2

Yeah! I got my stamps today! They are beautiful... Thank you Charan!

If you are not familiar with Charan's work you should check out his website at http://www.creativewithclay.com/
or his blog at http://www.creativewithclay.blogspot.com/

His craftmanship is impeccable and his designs are top notch!

I've set them by my computer so I can look at them and plot how I'm going to begin making use of these little wonders. I can feel my world shifting with all of the possibilities! Just another hour or 2 until it's studio time. I can hardly wait...

These are what I got in the mail. The results of a group stamp swap for the Etsy Mud Team. I sent out mine just the other day...
If you would like to see the photos of everyone's stamps, just give this a click.

Monday, February 23, 2009

Experessions

After 5 days of Ibuprofen & Hydrocodone to help with a hurt back, I’ve got to celebrate this small victory by saying “Yes!” The 2 vases submitted for the “Expressions” show in Tracy, CA. sold last week! Happy dance! Doh! Ouch…

Sunday, February 15, 2009

EMT Stamp exchange

I love the Etsy Mud Team! This team has been one of my studios’ best sources for information, inspiration, and friendship. That’s a lot to get out of a group!

I really should save this rave for a different soapbox moment though…

This is a quick posting showing what the studio is throwing on the pile for this season’s group exchange. They’ve decided to make and exchange bisque stamps this time; I love stamps, so naturally I wanted in on this project. I guess mine are should be considered sprigg moulds rather than stamps, but hey… I’ve always been difficult.
If you would like to see how I commonly use a sprigg mould in my work check out this past post. Click Here.

If you'd like to see what everyone elce is throwing on the pile, click this.

If you would like to see a really great stamp making tutorial by LaPellaPottery Click Here.

Other wise…

Licks, Love, & Luck…
-Zygote-

Monday, February 9, 2009

Struggles of Love


This series was done in all playfulness mixed with a dash of beaming Love… we live to create.

Oh yeah... they aren't poly wogs.

Monday, January 26, 2009

Tidewater Souper Supper Finished Bowls Part 3

I'm aiming to hit the hoop this week. This was the third and final kiln load of bowls for the TideWater Souper Supper. It was a gas firing hosted by Delta Community College’s ceramic’s department.

Thanks’ Joe!


It’s been a long time since I’ve had to put a good amount of faith into student glazes. Any questions that were asked about the suggested application or behavior of any of the glazes were met with shrugs.”Eh?” Guess that’s par for the course. Love a challenge though. Here are six of 30.

Sunday, January 25, 2009

TideWater Souper Supper Finished Bowls Part 2

So after spending days and days of throwing, slipping, and glazing oodles and oodles of bowls… I’ve finally unloaded the 2nd of 3 glaze kilns that I’m burning for the TideWater’s Souper Supper fundraiser. Here’s 6 bowls from the second kiln load.


This is a quick selection from the second kiln load of 40 bowls for this year’s TideWater’s Souper Supper fund raiser. I’m really happy; there are a lot of very nice pieces this year. I’ve only lost 3 bowls this time through. One more kiln load to open still. This last load is part of a kiln load up at the local community college’s gas kiln. Professor Joe Mariscal volunteered to donate kiln space for a community cone 10 gas firing in support of the project.
Thanks Joe!
It’s been cooling down for a few days; it’ll be ready to be opened first thing tomorrow morning. The anticipation is needling me.

Friday, October 24, 2008

And Now... For Something A Little Different...


Even after 8 years of living in Stockton, I'm amazed... the weather is so beautiful and wonderful in Northern California right now. Fall is definitely here. The leaves are turning and falling, the chimneys are beginning to churn out my favorite fall smells, and our morning family walks to the school bus are beginning to have a chilled edge that helps wake us up (the cups of hot chocolate help make the darkened walks something to look forward to). Every single day this week has been so amazing that I was driven out of my studio and into my Gardens on the Delta Community Collage Campus to get my fall, winter, and spring color in and lay down seed.
If you love thinking with your hands, this job is over 3 acers of heaven.

When I took over these gardens they were FILLED with chest high weeds. Rather than spraying I chose to comb out the weeds by hand literally inch by inch. Completely worth it. The campus shredded a handful of massive redwoods and now I've got 3 bus sized piles of shredded trees to mulch my beds with.

Almost a year and a half later, I can actually have students work out in the gardens without getting so frustrated that they leave, and now it's even becoming the garden of "Love". Some mornings I have to hit the sprinkler system to chase out enthusiastic short term residents.
Yea... I know... So what, but my thumbs are rest'n in my arm pits and I've got a rye stem wedged in between my teeth. Liven is good.

God I LOVE my job!
COOL!

Sunday, October 5, 2008

A Quick Bio

It's been pointed out repeatedly that I should get around to this posting. The personal Bio.
I've never been too thrilled to toot this particular horn, but hey... So while I'm waiting for parts for the kiln to finally to show up, and the rain to stop...here we go.

My name is Zygote. I'm a semi-retired technical foundry artisan, a jeweler, a ceramicist, and a gentleman's gardener. I turned 40 this year!
I was born in late sixties in Cedar Rapids Iowa, a beautiful, agrarian city nestled along a river and among farm fields and old oak forests.
It's a community that traditionally thought with its hands. It's a community that values and takes great pride in its laborers, thinkers, craftsmen, and artists and it still raises its’ children with the belief that much of life’s wisdom is found through the handle of a shovel and through encouraging a curious exploration of the natural world.
As a 16 year old, I was encouraged to begin formal art training and left home to attend Memphis Academy of Arts to study drawing, sculpture, and silversmithing. By the age of 20, I had established the beginnings of a private silversmithing studio for ongoing personal nighttime studies and had accepted my first position as a technical foundry artisan in an arts foundry in Arizona. The next decade was spent working with groups of artisans providing technical assistance to professional artists in producing bronze works for private collections, museums, and large public art works for display throughout the southwest, west coast, and pacific rim countries.
In 2000 my wife and I moved our growing family to Stockton, California. I really needed a few years to relax and begin a new creative path in ceramics and gardening while we began raising 2 young children.
Over the past 3 years, most of my personal studio activities has been focused on creating personal silver and ceramic work for the FetishGhost collection and serving my local community through my new studio, RedGate Ceramics. Through RedGate I create a distinctive high quality body of domestic ceramic wear that speaks specifically to my local markets, and is beginning to cater to a handful of regional galleries. I really enjoy my new path in ceramics and my work keeps improving as I push forward. The best part is having a artistic vehicle that allows me to interact closely with my community.

But... it's my affair with FetishGhost that's drawn the most attention though. For over the past 20 years, I've generally been known for my unique approach to handcrafted sterling macabre. The silversmithing studio is firmly anchored in the past. I use a mix of traditional preindustrial silversmithing and jewelers skills to create my Gothic SteamPunk designs, eschewing any premade or mass produced parts or findings. I've been dancing with this muse since 1988
and I love making subtle and noodlely detailed work done in a heavy & stylized motifs of the North American Southwest Macabre (now part of a developing Southwest Goth aesthetic). Lately I've started to enjoy realizing more of my rather “operatic” designs. These are designs, that while they are made to be sensuously experienced by the wearer, their obvious intent is to project the wearers chosen personality.

As always, I'm really excited about the next group of pieces. I'm hooked on the thrill of discovery and
something new is always bound to happen. Now that the children are getting older, things could get really strange.

I can't wait!

Thursday, October 2, 2008

Throwing Lids for Canisters

I've been taking up some loose time this week with filling inventories for November. My kiln blew an element last week and now I'm passing time until the replacement part arrives. I've been throwing canisters for my local farmers markets.

So... this post is about lids.

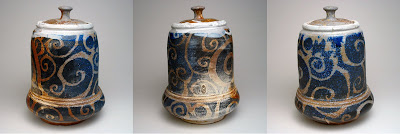
I know a lot of potters hate throwing lids, I hear professionals and students alike grump their way through this chore. I've been lucky, I've really enjoyed developing my approach to throwing this type of lid. It's taken a few years and a few hundred lids to work out most of the kinks, but the time spent was well worth it.


My lids are made with heft, durability, and functionality in mind. They have got to stand up to at least a family's worth of use. They are truly a functional item that need be well crafted to fit to their companion well. Still, at the same time, I create these with an eye on my personal decorative athletics of strong curvilinear lines, clean tight surfaces juxtaposed with textures, and with a well formed knob on top.

The carved out concave in the center in the bottom of the lid is purely functional, it helps even out the drying of the form, decrease the weight, improve it's balance, and, well... I like it.

This is a deceptive shot. I'll usually throw a series of 7- 15 canisters in a sitting. All of the galleys are made to meet whatever my current predetermined inner diameter is. This is a ritual of studio covenience for me, this way I'm free to explore a body's form and the lid will essentally fall into place as it moves through the studio. This piece shown is almost 12 hours old. Shrinkage at this scale makes a huge difference... so pay attention to the "wet measurements" of those openings. Take notes and figure out your shrinkage scales of the clays you choose to use, it really pays off.


Let it dry to leather hard before trimming....


I throw a fresh trimming chuck to softly hold a green lid and slowly enlarge it as I work though a lid series.


This is the finished fit for a lid in a greenware canister. I don't approve of excessive slop in the play between the lid and galley. When I throw 15 canister bodies I throw 20- 25 lids and mix and match to fit the greenware.


To get a feel for the entire process, check this out.