Friday, December 26, 2008

Smash Pot Day

Swinging the hammer of judgment is one of the most anticipated yearly studio activities for a lot of potters.

Some artists choose to just swing the hammer all year round, but I prefer to save up all of the messed up pots, setting them in the nooks and crannies of the firing room and garden.

I save them for a special day... SMASH POT DAY!


I traditionally save this special day for the end of the year, but I really can hardly wait to swing the hammer on this year’s accumulated ware. A lot of these pieces are gorgeous, but they have one flaw or another... a crack, a stuck lid, a glaze that ran off, kiln wash fired into the surface, the list goes on and on.

This is a ritual of necessity, ensuring the quality of any studio’s line-up. This year I’m happy to say I’m letting go a 140 pounds of fired work. DOH!


“Smash it up and plan for the next year”… that’s my motto.

Sunday, December 21, 2008

WinterVines Cairn

This is the second in the series for this springs first round of works for regional exhibitions. It's still got 2 weeks of drying to do before bisque firing and glazing. 2 cairns down, and 2 to go.

Friday, December 19, 2008

Meet my Studio Photographer

This is Andor. He's the studio photographer for FetishGhost and is working on learning to make good use of the support software needed to build and run an online storefront. A lot of what you see on this blog, he's helped produce.
I first drafted him to snap a few shots in the summer of 07. It was just something to keep him busy while school was out, but since then he's become an valuable asset to the studio, taking on the duties to help coordinate the shooting of demos and product shots.

OK, before everybody starts pestering me for his business card, I've got to point out he's just turned 10 last month. and my wife won't let me rent him out yet.

Thursday, December 18, 2008

Mixing Up a Simple Slip

Making a super simple slip starts with collecting up some of your trimming scraps from your current white bodied clay. You don't really need much... 300 grams is a good single batch amount to play with for starters. Multiply that by whatever number you might have in mind to experiment with other oxides and stain mixes.

Here comes the fun part... my kids joyously referred to this particular chore as "let's whack Daddy!" They volunteer for it every time and quite frankly, it's got me rather nervous, but it's got to be done so get whackn!

For this chore I use an old pair of blue jeans, (I know you were saving a pair for something like this). Just load up a leg with a manageable amount. You'll figure out how much is enough pretty quick. Special note, if you pack it too full your crotch will pop... really messy.
Now grab your trusty small hand sledge and just lightly pound the hell out of it. Like I said, my kids think this is hilarious.


This is still pretty chunky, but it'll work just fine.

At this point I feel I should point out another advantage of using crushed clay to make your mix... it's a lot easier to get an accurate weight ratio of clay to colorant you'll need.

I like strong colors, so I multiply the weight of my crushed clay by 5% to 10% to get the weight needed for my oxide colorant. Commercial stains seem to like the 10% to 15% ranges. It's really up to you how strong you like your colors. This is where you get out those test tiles and experiment.

Slowly add your crushed clay and oxide mix to the water. Keep at it, slowly building up an island in the center. The island will subside below the waterline as it pulls water into the mix. Keep adding your crushed clay mix until it all in there. Kind of give the tub a small shake to collapse the island one last time, and let the mix slake overnight. In the morning, just pour off the excess water and stir well and "Voila!" A simple slip.

Monday, December 15, 2008

WinterCairns

All right... it's started moving into the “it’s really cold, wet, and rainy” time of year for my studio. This is still Northern California so the temperature, at its best, generally is topped out in the middle of the day at 55 degrees, (and I count myself really lucky it’s this warm). This is the down side to working in an old Garagio. It really is cold… and work takes many, many days to dry, and sometimes… things freeze! So aside from the bit about things freezing, things are fairly manageable… I can boil water for my throwing bucket to keep myself warm… (that’s really nice….) the slow drying can be an inconvenience if you’ve got small work trying to dry, but it’s really nice if you have larger thick walled projects that appreciate being slow dried.
Or…. you can see if your friends will let you hang out in a spot in their toasty warm studios during the winter cold snaps. I like this option… they’ve got better hot chocolate, and... oh yeah… heating. Being a decent guest you might be expected to do a little wedging, maybe some trimming, definitely some story telling…. It’s all about that winter camaraderie thing.
So I’ve been spending to past week getting started on creating a series of Cairns for this spring's exhibitions. These are large(ish) decorative ceramic post markers, and due to their size and complexity, they can be tricky to get across the finish line in a stately manner… (Understatement). Luckily, they really like to be slow dried and they make use of a lot of the techniques I’ve been playing with this year.
For me, these forms provide a more sculptural surface for developing more complex narratives and they also provide a glorified test tile for exploring studio archenemy. This could get really fun… we’ll see… I’m hoping to pick through the results of this winters work and gallery mount a few finished pieces for spring’s and summer’s exhibitions. I guess we’ll have to see....


This is the cobalt slip
and a veiw of cutting the stencils with a razor blade.


This is the proposed slip & glaze combo I'm planning to use... it's a cobalt slip and MoonCrater White glaze.
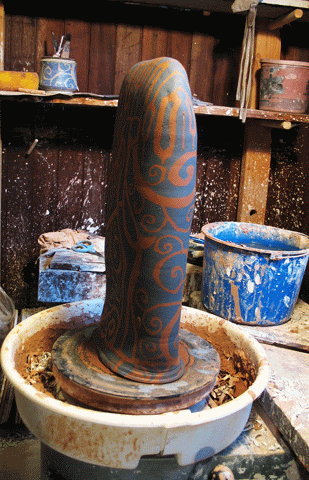
Working through the form....
Applying the stencils & sponging on the slip...

All most there...Hallmarked and now we let it dry S-L-O-W-L-Y...

Friday, October 24, 2008

And Now... For Something A Little Different...


Even after 8 years of living in Stockton, I'm amazed... the weather is so beautiful and wonderful in Northern California right now. Fall is definitely here. The leaves are turning and falling, the chimneys are beginning to churn out my favorite fall smells, and our morning family walks to the school bus are beginning to have a chilled edge that helps wake us up (the cups of hot chocolate help make the darkened walks something to look forward to). Every single day this week has been so amazing that I was driven out of my studio and into my Gardens on the Delta Community Collage Campus to get my fall, winter, and spring color in and lay down seed.
If you love thinking with your hands, this job is over 3 acers of heaven.

When I took over these gardens they were FILLED with chest high weeds. Rather than spraying I chose to comb out the weeds by hand literally inch by inch. Completely worth it. The campus shredded a handful of massive redwoods and now I've got 3 bus sized piles of shredded trees to mulch my beds with.

Almost a year and a half later, I can actually have students work out in the gardens without getting so frustrated that they leave, and now it's even becoming the garden of "Love". Some mornings I have to hit the sprinkler system to chase out enthusiastic short term residents.
Yea... I know... So what, but my thumbs are rest'n in my arm pits and I've got a rye stem wedged in between my teeth. Liven is good.

God I LOVE my job!
COOL!

Saturday, October 18, 2008

Busy busy busy...

It's been a fantastic week. It started with a late night bisque firing Sunday night and the rest of the week was spent glazing, firing, doing 2 more bronze pours, and I got in a lot of gardening. The bronze pours are going really well. We're still tuning up the foundry layout and getting it outfitted for work flow and safety. The fun part is tyring to get a new crew of interested students drummed up.


I had 33 pieces go through the firing and I managed to not loose any pieces this time! Not only that, but everything came out fantastic! The optical effects of the GhostBlue and White Liner glazes is ammazing on this kiln load. The neighborhood florist promptly confiscated 6 of the vases, 3 cups have already been pulled for gallery submissions, and the rest of the ware is either for the local Potters Guild fall sale next month or for posting on Etsy.
It's more of the same next week, I can't wait! Gosh I love this job!

Friday, October 10, 2008

MoonCrater White Glaze

I generally maintain 2-3 white glazes for my work in the studio at any given time. I have a dependable white liner that I use mostly on rims and interiors of domestic ware. I usually like trying out experimental white glazes for future works, and then there's my MoonCrater White.

This is the recipe for the MoonCrater White cone 6 oxidation glaze that I use in my electric kiln. It's a fairly standard white satin matte glaze that I ran across in a February 2003 Ceramic Monthly. The only change I've made was switching out Tin Oxide for Zircopax as a opacifier to give me a softer white.

Gerstle Borate 31.6%

Talc 14%

Kona F-4 Feldspar 19.8%

EPK 5%

Silica 29.6%

Add:
Tin Oxide 5%
Bentonite 2%

By nearly all accounts, this is a bland unpredictable glaze that I should have stopped mixing up 2 years ago, but... well, I like it.

It's faults are what makes this glaze so interesting . When it's overfired on a cone 5 clay body, the glaze develops a rich creamy semi-translucent white satin matte that's inclined to develop patches of wonderfully textured orange peel effects that often transition into shallow open soft edged craters. This is a pleasantly usable texture glaze.


The main reason this glaze is still made is that it's mixed proportionally with a Nutmeg glaze to create an all purpose wonderfully warm earthtoned glaze that's a customer favorite. In house, I refer to this mix as a NutWhite glaze.

The personal reason I still mix this glaze up is because I love what happens when I use it over paper stencil cobalt slipped designs on a red stoneware clay body.
While I'm still never really sure how this glaze will come out of kiln, I love and live for the anticipation of creating works for this glaze. It's a glaze that provides me some of the highs and lows that make studio life so rewarding.

Bronze Pour

Gosh I love bronze pours! I've done literally thousands of them and I still get all giddy just hearing the rumble and smell of a furnace. There's something that makes me feel all warm and fuzzy about pulling a 1900 degree pot of molten bronze out of the furnace.

High octane liquid potential.

I have to thank Sculptor and professor Gary Carlos for letting me help with these pours at Delta Community College in Stockton.
I had done a pretty good job putting out of my mind how much I enjoy the experience, but I think that's been blown... I'm hooked again. Damn!

Thursday, October 9, 2008

Back to Burnning

Well, my kiln repair worked and I got a glaze load fired off. I'm always relieved when my repairs haven't created any larger problems. The repair was strait forward enough, but even something as simple as replacing a broken element is really hard on this old kiln. The soft brick walls the elements are embedded into are very quick to crumble and I've been eyeballing a switch or two, wondering when I'm going to get to learn how to test and fix them as well.


I'm happy with how this load came out. The teapots came out really really nicely, and the yunomi cups, with their thickly slipped hakeme surfaces under a translucent dark amber glaze, came out beautifully.


These are gorgeous!


I started pushing a load of small teabag trivets through the studio again. I was surprised at how well these were
received last fall. I've sold and given away all of last years load of trivets and I've already gotten enough seasonal requests for these little dishes to make me begin creating a larger inventory for my fall sales.

There were a few 14 pounders in on this load too. These are some of the large sectional thrown canisters that I've been working on lately. I've I needed a few of theses larger canisters for Novembers Potters Guild sale. This is the scale I love to work in. It's taken over a year to start getting consistent results that I can begin to count on. Now I can more freely invest the time the time necessary to create more elaborate surfaces with out fretting over major defects.


These aren't the most exciting glazes, but they are handsomely warm. Besides... they're a great "fit" for the recycled clay body that I used to practice throwing these canisters.

Tuesday, October 7, 2008

My Love Affair With a OverSized Toaster

Ok... I'll admit it. I've been a little tetchy the past... what is it now? 10 days? It all started with a 11 hour glaze firing dragging on to 17 hours without bending cone 5 before I had to shut down the kiln. Yeah... you guessed it...It was a blown kiln element.
I really hate shifting gears like this, I'm still a novice at managing this multi-media juggling act and it takes me a day or 2 longer than it should to committ to creating something elce that isn't schedualed and prepped for.

This was the 3rd element to blow this year. I love this old kiln. It's an old Duncan DK1029-2, a hand-me-down from an old friend who thought I could make good use of it. I have to bow down to her wisdom... she was right, I've grown a lot with it. I've learned a lot about installing and fixing electric kilns over the past 2 years for starters. I'm really happy to say don't have any problem with a tare down any more. Hell, if it wasn't for all the waiting for parts to arrive and watching the soft brick quickly disintegrate as I change elements, I'd actually say I enjoy fix'n this old beast.
I'll be happy tomarrow to do my test burn.