Nobody told me that we could do this!

 Image transfer can be as simple as painting a tinted slip onto a piece of foam...


 I'm Hooked!
There is a back story that goes with this... but until then....
Image transfer can be as simple as painting a tinted slip onto a piece of foam...
I'm Hooked!
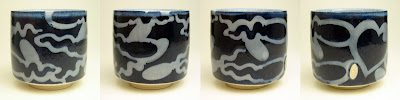
 This project spun out of this winter’s bowl marathon for the Tidewater Gallery’s annual soup feed. I throw about 7 batches total, 10 to 17 bowls at a time and break these down into smaller separate groups for handling the surface decoration. This is how I generally prefer to create my work. I enjoy working in series of 5 -
 15 pieces at a time, this lets me explore any new idea or technique a little before drawing any initial conclusions and making any changes in my approach.
 consistency of a thick heavy cream. The sodium silicate lets the clay platelets to slide over each
  other easier so I don’t have to add so much water to the mix to get the slip to the consistency I want.
 After the stenciled design has dried sufficiently to gently handle, I invert the bowl and pour the slip over the upper half.
This is a video shot last night in the studio as I worked on testing this series of stencils. Sometimes these just don't work as well in real life as they do in my head. The gear designs worked really well though, they laid down well on the compound curved surfaces up the cup without bunching up and they nicely fit into the space. Whoo ho!
 This is the process of applying the newsprint stencils to the surface of a freshly thrown cup that's still attached to the wheel head. The stencils are adhered to the surface by spritzing the surface of the cup with water and laying the stencil in place. A gentle pressing with a damp sponge sets the stencil in to place.
 A contrasting colored clay slip is then sponged over the entire design. This slip was colored with cobalt oxide, this will fire to a wonderful blue that will influence any glaze that applied over it.


